MAVBridge
MAVBridge allows to control your quadcopter (or any other MAVLink-speaking robot) with MAVLink protocol over standard WiFi connection.
Quick start (for official hardware)
If you have official hardware and Pixhawk (or compatible) flight controller you can just plug MAVBridge with the supplied cable to Pixhawk's TELEM 2 port, choose the correct baud rate in MAVBridge settings and you should be able to control the copter over WiFi.
If you have a different flight controller, proceed with instructions for wiring.
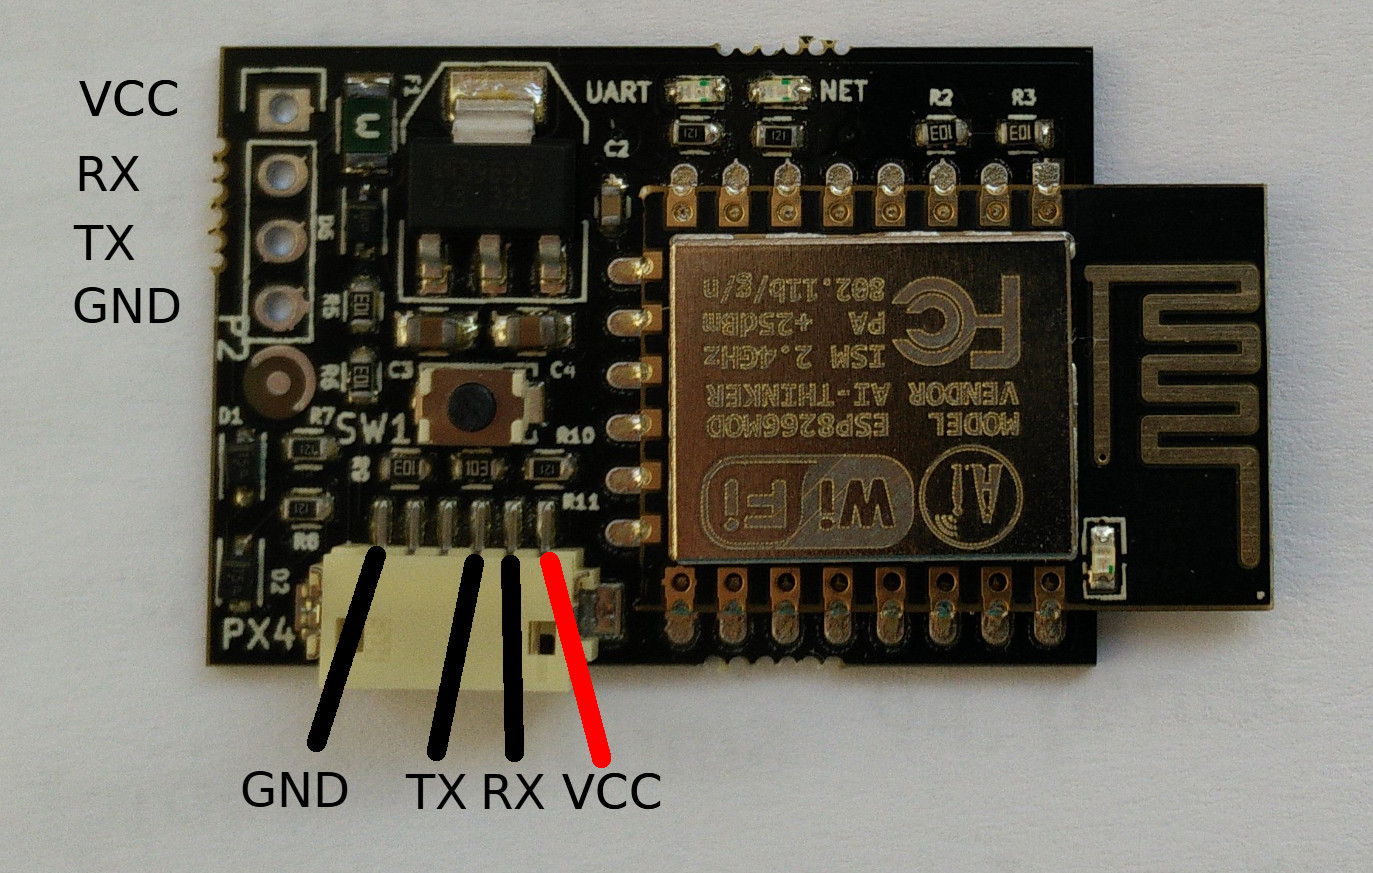
A: Wiring
Connect MAVBridge to your quadcopter. Required signals for this are: TX, RX, Vcc and GND lines.
| Flight controller | MAVBridge |
|---|---|
| 5V | 5V |
| GND | GND |
| TX | RX |
| RX | TX |
As always, disconnect all power before starting the wiring!
Permissible range for power input is from 3.2 to 5.5V, so you can use a single-cell LiPo battery to power MAVBridge.
B: Initial configuration
By default, MAVBridge starts in access-point mode and will appear in the list of wireless networks as MAVBridge-xxxxxxxxxx. Connect to this network and open http://192.168.4.1 in your browser.
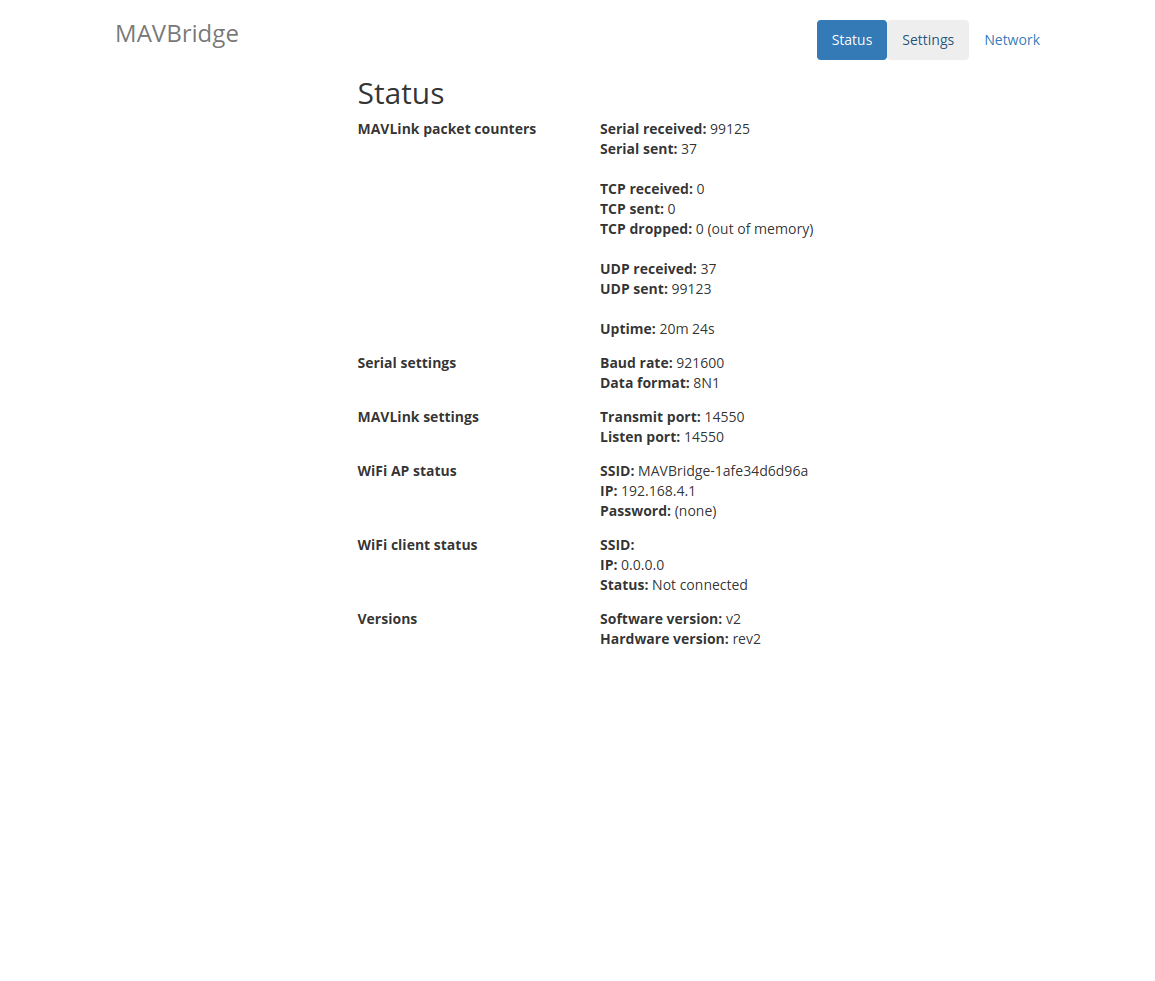
In order to pass MAVLink packets from flight controller to your phone, tablet or PC, MAVBridge needs to know what is the speed (baud rate) of telemetry port on your flight controller. Default value for PX4 and ArduPilot flight controllers is 57600 (which is also default value for MAVBridge).
Baud rate is the most important parameter to have a working MAVBridge.

If the baud rate is correct and autopilot is transferring MAVLink packets, you will see UART activity LED blink on MAVBridge.
C: Network configuration
MAVBridge can act in access-point and client modes (with or without password).
If you want the MAVBridge to connect to your existing WiFi network, you can do that in network settings page.
Just choose the network you want to connect to and enter it's password.
Software settings/configuration
- Make sure you are connected to the same network MAVBridge is, and the UART LED is blinking (this means MAVBridge understands your autopilot).
- In GCS software (e.g. MissionPlanner/APMPlanner), add a new UDP connection. Enter your computer's IP address and 14550 as port number (typically: 192.168.4.2:14550).
- Verify that data is being received from autopilot.
Note 1: APMPlanner will connect to MAVBridge on the network as soon as you open it. MissionPlanner only requires creating new UDP connection and accepting default settings.
Note 2: MAVProxy seems to ignore broadcast heartbeat messages. Unfortunately, this means that MAVBridge does not know your computer's IP address and cannot communicate with it. One possible workaround is to first start mavproxy on broadcast address (192.168.4.255:14550) and then start it on normal address.
Software updates
MAVBridge has built-in over-the-air firmware update capability. To update firmware, please first connect to WiFi network which has access to internet. Then go to settings screen and click "Update firmware" button. Parameters will be reset to default values after firmware update!
Factory reset
In case you have forgotten password for MAVBridge, you can reset it to default parameters and access it again by long-pressing the push-button on MAVBridge. Press and hold the switch until LEDs start to blink, then release it. In case you still don't see MAVBridge network, please power-cycle it (it enters bootloader mode if the button is held pressed too long after LEDs started flashing).
Specifications
| Input voltage | 3.2 - 5.5V DC |
| TTL level | 3.3, 5V supported |
| Protection features | Reverse-polarity protection, overheating, short-circuit protection. |
| Current consumption | 120 mA idle, up to 300 mA peak (transmitting) at 5V. |
| Size | 24x40x5 mm |
| Weight | 4 g |
| WiFi modes | access-point, client (simultaneously) |
| MAVLink protocol versions | v1.0 |
| GCS software | MissionPlanner, APMPlanner, qGroundcontrol, Tower, DroidPlanner, MAVProxy |
| Baud rate | 9600 - 921600 |
| Data rate | 67KiB/s without any packet loss (UDP mode, 921600 baud rate). |
| External indication | 2 LEDs- notifies about data from UART and WiFi |
Source code
All the sources for firmware and hardware are licensed under permissive MIT license and are available on github.com/festlv/mavbridge
Hardware revisions
Revision 2
Publicly released version.
- Added switch to reset parameters,
- Removed reset-related circuitry.
Revision 1
Initial prototype version.